
How To Configure WebSocket Servers For Secure Connectors (Wss Protocol)


WebSockets are a great way of improving your web applications to be faster and more responsive. They provide persistent bi-directional communication between a user and your server, making them unique.
With WebSockets being prominent for their features, they are prone to attacks. Hence, you must become your own CA and enforce the use of SSL/TLS certificates to encrypt your server to secure it from attacks.
In this article, you will learn how to set up your server, know what SSL/TLC certificates are and why they are necessary for setting up secure connectors, configure your server to ensure secure connections using SSL/TLC certificates, and ways to debug and monitor your application.
Understanding WebSockets And WSS Protocols
WebSockets are a communication protocol that uses a specific handshake process to connect users and servers. The handshake process upgrades the existing HTTP connection to a WebSocket connection. Once this occurs, the WebSocket protocol uses a specific method to ensure that the server sends the messages in the correct order.
WebSockets are a must-have when creating dynamic and responsive web applications. It allows users and servers to have real-time communications. They also have low latency and reduced overhead, which helps improve any web application's performance. It combines the WebSocket protocol and the Secure Socket Layer(SSL).
Unlike the traditional HTTP request, once a WebSocket is initiated, it does not need to reconnect after a response.
Setting Up Your Server
Selecting a suitable WebSocket server is determined by a few general factors. The first factor is the feature you would want your web application to have, e.g multi-languages.
The next factor would be to estimate the application's traffic for the server and to ensure you get a server that can handle the load. Scalability and cost are the two last factors to consider. Below is a list of WebSockets available with React.
Socket.IOuWebsocket.jsSockJSWS
Below is a code sample showing a basic WebSocket server setup using Socket.io in React.
You should have node.js already installed on your local machine and create an
index.jsfile for this application.
const express = require("express");
const app = express();
const http = require("http");
const server = http.createServer(app);

app.get("/", (req, res) => {
  res.send("<h1>Hello world</h1>");
});

server.listen(3000, () => {
  console.log("listening on *:3000");
});
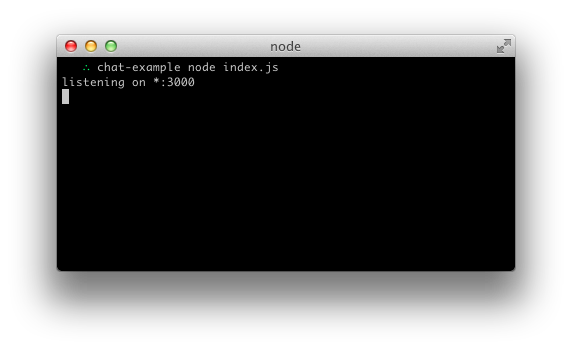
This code creates a server on port 3000, it sends a welcome message and then listens for a message from the user.
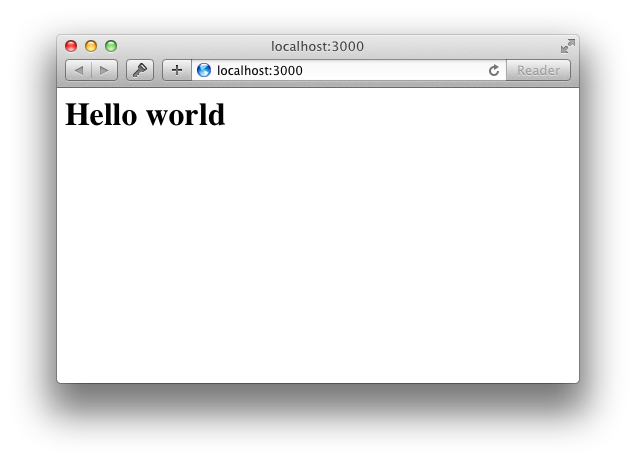
Once you run node index.js on your machine, this would be the output:
This is what your output should look like on the client side:
You can expand the code by adding a disconnection and connection event. As shown with the code below:
const express = require("express");
const app = express();
const http = require("http");
const server = http.createServer(app);
const { Server } = require("socket.io");
const io = new Server(server);

app.get("/", (req, res) => {
  res.sendFile("<h1>Hello world</h1>");
});

io.on("connection", (socket) => {
  console.log("a user connected");
  socket.on("disconnect", () => {
    console.log("user disconnected");
  });
});

server.listen(3000, () => {
  console.log("listening on *:3000");
});
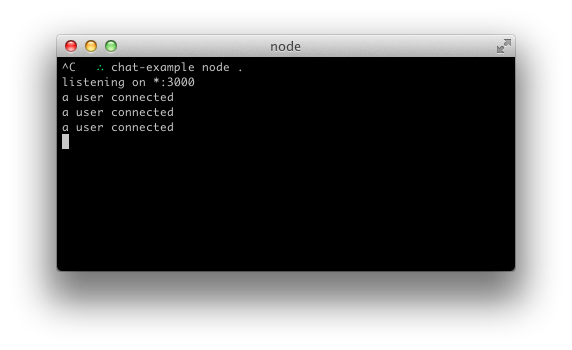
This code is an expanded version of the first code, the only difference is the addition of connection and disconnection events that show when a user is connected or disconnected.
Note that when creating this server, use the
httpmodule andserver = http.createServermakes the application not secure.
When you run node index.js on multiple tabs, this would be your output:
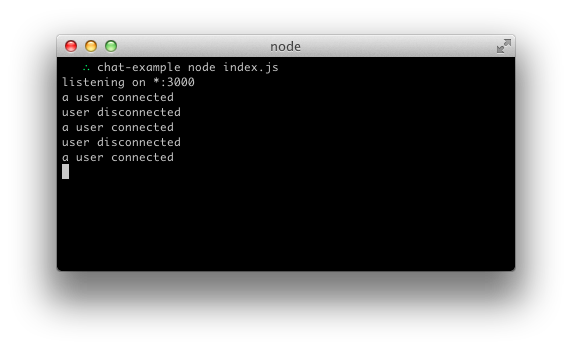
While this image shows you the result of opening and closing multiple tabs:
Enabling Secure Connections Using SSL/TLS Certificates
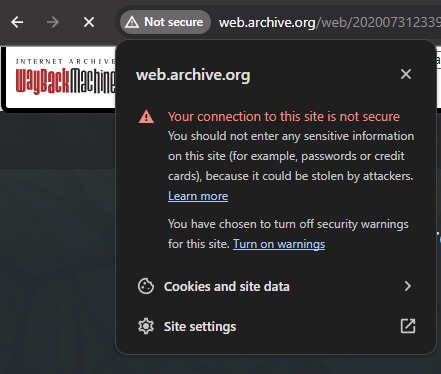
Most times, when opening applications online, your browser might alert you, giving you a warning that tells you the application you are about to enter is not secure.
This simply means that the application employs the use of traditional HTTP and is not secure.
The image below shows what the error should look like:
A sure way of avoiding the error shown above is by becoming your Certificate Authority(CA) and then using the wss protocol for your server.
The first step to becoming a CA is generating your private key using this:
openssl genrsa -des3 -out myCA.key 2048
After you have done that, you will be asked for a passphrase. This prevents anyone from generating a root certificate of their own if they get access to your private key.
Your output should look like this:
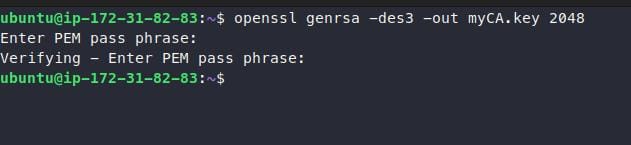
You mustn't skip this stage and ensure your passphrase is secure.
Then you generate a root certificate.
openssl req -x509 -new -nodes -key myCA.key -sha256 -days 1825 -out myCA.pem
You will be prompted to input the passphrase of your private key. A bunch of questions will be provided for you to answer, it should look like this:
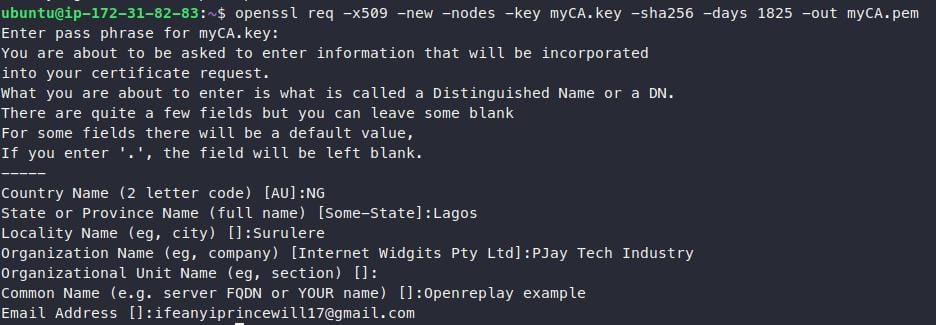
The common name should be something you will recognize easily as your root certificate in a list of other certificates.
You should now have two files myCA.key which contains your private key and myCA.pem which contains your root certificate.

To become a fully functional CA, install your root certificates on all your devices.
Since you are now a fully functional CA, to host a secure WebSocket server in node.js, you can use the sample code below:
import { Server as WebSocket } from "ws";
import { createServer as HttpsServer } from 'https';
import { readFileSync } from "fs";

server = HttpsServer({
    cert: readFileSync('path/to/myCA.pem'),
    key: readFileSync('path/to/myCA.key')
})
socket = new WebSocket({
    server: server
});

socket.on(...);
server.listen(3000);
This code creates a server that imports the ws module, the https module, and the fs module to add security to your WebSocket server.
server = HttpsServer({...}) creates an HTTPS server that uses the HttpsServer function to configure the appropriate files.
The cert:readFileSync('...') and key:readFileSync('...') loads the SSL certificate and SSL key from the specified path respectively.
The socket.on(...) function is blank for you to add the necessary event listeners as needed.
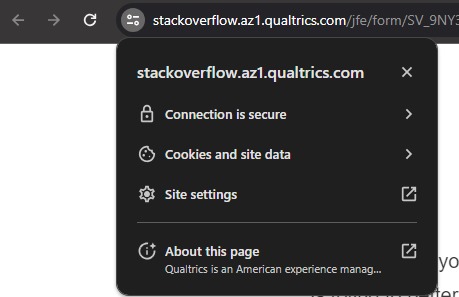
If you have followed the steps above, your application should come up on Chrome or any other Web browser as a secure connection as shown below:
Monitoring and Logging
There are many reasons why you should monitor and log your servers. Security is one of the primary reasons. WebSocket servers are prone to attacks, and monitoring your servers would help you predict and prevent these attacks from occurring.
To help you track your server, you could take the following steps;
Choose a monitoring tool. e.g. Prometheus, Datadog.
Configure the tool for specific alerts and notifications you want to look out for.
Choose a logging tool, e.g. Splunk, or Papertrailor.
Configure the logging tool.
These tools help you predict potential attacks on your server and you must learn to analyze the data for protection. Examples of security threats you are looking for include;
Brute force attack, where an attacker tries to guess a user's password.
Denial of Service(DoS) attack, is when your server(s) is overwhelmed by traffic from an attacker pushing out legitimate users.
Man-in-the-middle attack, where information is intercepted and one of the parties is impersonated.
The code below shows you a console.log method for monitoring your server.
const io = require("socket.io-client");

const socket = io("https://localhost:3000");

socket.on("connect", () => {
  // Start logging all messages that are sent and received by the Socket.IO client
  console.log("Connected to the WebSocket server!");

  socket.on("message", (message) => {
    console.log("Received message from the server: ${message}");
  });

  socket.on("disconnect", () => {
    console.log("Disconnected from the WebSocket server!");
  });
});
The code creates a Socket.io instance socket and connects it to a specified URL https://localhost:3000.
It then sends a message when there is a connection or disconnection event.
Testing And Debugging
Testing your server for different issues and debugging your application would help it run smoothly.
Common issues faced in WebSocket servers include;
Connection problems.
Message delivery problems.
Performance problems.
Security problems.
The code below would help you attempt a basic testing of your server.
const io = require("socket.io-client");

const socket = io("http://localhost:3000");

socket.on("connect", () => {
  // Send a test message to the server
  socket.emit("message", "Hello, world!");

  // Verify that the server responds correctly
  socket.on("message", (message) => {
    if (message !== "Hello from the server!") {
      throw new Error("Request failed.Unexpected response from the server");
    }
  });
});
The code establishes a Socket.io connection of a client connecting to your server, sends a message, and verifies the server's response as a means of basic testing.
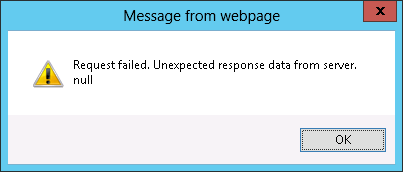
if (message !==...) would trigger an error message if the response gotten is not what is expected. This code is a performance tester.
The error message should look like the image below:
Note: The appearance of your error message may vary based on how your HTML and CSS files are configured.
Conclusion
In this article, you've learned what WebSockets are, why they differ from HTTPS, and why they should be secure. Most importantly, you have seen practical examples of how to set up your servers, implement secure connections, and manage them.
Reading up on other articles about WebSockets can strengthen your knowledge on the topic. Luckily, some of the articles on the OpenReplay blog can help you explore WebSockets.